What is a Boot Sequence?
Boot Sequence:
•The order in which a computer looks for nonvolatile data storage devices with program code to load the operating system is known as the boot sequence (OS).
•ROM and BIOS are typically used by Windows and Macintosh structures, respectively, to initiate the boot process.
•The CPU gains control and loads the OS into system memory after finding the instructions.
•In other words, Boot sequence is the order of storage devices that the computer will try to boot from.
•For example, the computer will first try to boot from the internal hard drive, then it’ll try to boot from a USB drive, and then it will try to boot from any network images or storage that may be available.
•In most situations it’s only important when you’re first installing an operating system on the computer as you’ll want to boot from the USB drive since the hard drive is blank, or if you have two hard drives with two different OSs and you need to choose which one you boot into.
•A Windows PC’s BIOS or a Macintosh’s system ROM are accessed to begin the boot process. .
•Basic instructions that explain how to boot up the computer are contained in the BIOS and ROM.
•Following transmission to the computer’s CPU, these instructions start the process of putting data into the system RAM.
•The computer starts loading the operating system into system memory as soon as it discovers a boot disc or startup disc that is valid.
•The machine will be ready for use once the operating system has loaded completely.
•The boot sequence on the computer starts like this.
•When you turn on the computer, the system first searches the CPU, where all the boot drivers and other drivers are located and loads them from secondary memory to primary memory.
•Then it searches the whole computer installed drives where the operating system is installed.
•Then it loads it up, and if it does not find any operating system, it gives the user the error that no operating system is installed, or no bootable device is found.
•Please insert a bootable device and restart your computer.
•After successfully finding all the drivers and operating systems, the computer loads the operating system and starts the booting sequence.
•Depending on how the computer is set up, the boot process might take anywhere from a few seconds to several minutes.
•The startup time may be much greater if the machine is booting from a CD or DVD than if it is started up using a hard drive.
•Additionally, if your computer shut down unexpectedly, the system may do extra checks to ensure everything is in order, delaying the startup time.
•Hard drives, floppy drives, optical drives, flash drives, etc. are examples of the devices that are typically included as boot order possibilities in the BIOS settings.
•The CMOS setup allows the user to alter the boot order.
Boot order or BIOS boot order are other names for boot sequence.
How booting helps in boot sequence?
•Booting is the process of starting from nothing and ending with all the stuff that needs to be, running.
•It is derived from the concept of pulling yourself up with your own bootstraps, and that is appropriate, if not as impossible.
•In the very old days, we had to enter the first program by hand, keying it in one instruction at a time on the front panel.
•It had to be small, maybe a dozen instructions, because anything larger would be a royal pain to key in and you would probably make mistakes.
•Nowadays, the first program is held in a non-volatile chip on the motherboard.
•That’s the BIOS.
•It finds a device to boot off, maybe the hard disk and it loads the first 512 bytes from that device into a particular location in memory.
•Then it jumps to the start of those bytes.
•That 512-byte program isn’t very big, but it knows that it only must deal with this hard-disk, which makes things easier.
•It knows how to read the filing system on the disk to find a file with a particular name.
•That file is significantly larger and contains a program big enough to load the rest of the operating system.
•The OS looks in the registry to find all the other things that need to be running and it loads them.
•In computer terms, an initial boot program must be small and generalized, which means that it isn’t very clever.
•So, it does just enough to load a program that is bigger and less generalized, which in its turn can load a bigger program, and you keep doing that until your work is complete.
•The power-on self-test (POST), the first diagnostic test, is run before the boot phase.
•Whenever a computer is turned on.
•The boot sequence starts once POST is complete.
•The user is informed if there are issues with POST through beep codes, POST codes, or on-screen POST error messages.
•Unless differently programmed, the BIOS searches for the OS on drive A before searching for drive C.
•The BIOS options allow you to change the boot order.
•To enter the BIOS and alter the boot sequence, different BIOS models require a different key combination and onscreen instructions.
•Generally, the first device designated in the BIOS boot sequence will be tried to boot after the POST.
•The BIOS will attempt to boot from the second device listed if the first one is not suitable for booting and this procedure keeps going until the BIOS locates the boot code from the listed devices.
•An error message is shown, and the system freezes or crashes if the boot device cannot be located.
•Unavailable boot devices, boot sector viruses, or inactive boot partitions can all result in errors.
•The boot sequence, also known as boot options or boot order, specifies which devices a computer should search for the boot files for its operating system.
•It also describes the sequence in which devices are verified.
•The list can be modified and rearranged in the BIOS of the machine.
Steps in Boot Sequence:
There are mainly five steps involved in Boot Sequence.

Power up:
•Any boot procedure begins with the system receiving power.
•A number of actions take place when a user turns on a computer, resulting in the operating system taking control of the boot process and allowing the user to start working.
•The startup code in the ROM, which is situated on the motherboard, is executed by the central processor when the computer is turned on.
Power-On Self-Test:
•The POST, or power on self-test, is the following stage in the boot process.
•This test verifies the appropriate operation of all attached hardware, including RAM and secondary storage units.
•The boot process looks through the boot device list for a device with a POST response once POST has finished its work with the help of BIOS.
Look for a Boot Device:
•Because it provides the guidelines for communication between the CPU and other devices connected to the computer via the motherboard, the I/O system is essential for the operation of the computer.
•The I/O system offers extensions to the BIOS stored in ROM on the motherboard, which is sometimes located in the “io.sys” file on the boot device.
Load the Operating System:
•The boot process starts by loading the operating system from the boot device after the hardware’s functionality has been verified and the input/output system has been loaded.
•Any instructions specific to the individual operating system are carried out once the OS has been loaded into RAM.
•Since the computer will always boot in the same way, the actual operating system is almost meaningless.
Transfer Control:
•The boot procedure turns over control to the operating system once the conducted in this area are finished and the OS is securely loaded into RAM.
•The OS then starts any startup procedures that have been pre-configured to define user configuration or application execution.
•The transfer is complete, and the computer is now accessible.
The following is the order in which the boot sequence’s events occur:
1.The BIOS or system ROM of the machine is accessed: To start the boot process on Windows PCs and Macintosh computers, respectively. Basic instructions that explain how to boot up the computer are stored in the BIOS and ROM.
2. Computer CPU got the following start-up data: The computer’s CPU is subsequently given these instructions from the BIOS/ROM.
3. Information was recorded in computer memory: After that, the CPU starts putting data into the system RAM.
4. Operating system loading: The computer starts loading the operating system into system memory as soon as it discovers a boot disc or start-up disc that is valid.
5. The device is prepared for use: The machine will be ready for use once the operating system has loaded completely.
What is the role of RAM in the booting sequence?
•He main function of RAM during booting is the main function of RAM at any other time.
•Information that the CPU is going to quickly require is stored in RAM.
•This would be Operating System (OS) files from the hard disc in the case of booting.
•RAM is faster than the hard drive, which is true for both types of drives (especially older mechanical/magnetic hard drives; less true for solid-state drives).
•The system would shut down and crash if the processor had to rely only on the hard drive’s speed to access everything.
•The processor then loads information from the hard disc into RAM so that it can swiftly access and utilize it.
•Once those data are in RAM, they can move at any pace after a lengthy bootup process.
•If you don’t have enough RAM to run the whole OS, less-frequently-used information can be cached back to the hard drive, slowing things down.
•Therefore it’s important to have enough RAM to run your OS and programs and some extra for quick calculations and storage operations.
•RAM is fast, but it’s not permanent.
•When the machine is shut down or loses power, anything stored in RAM is gone. This is what the hard drive is for.
•It can save things permanently.
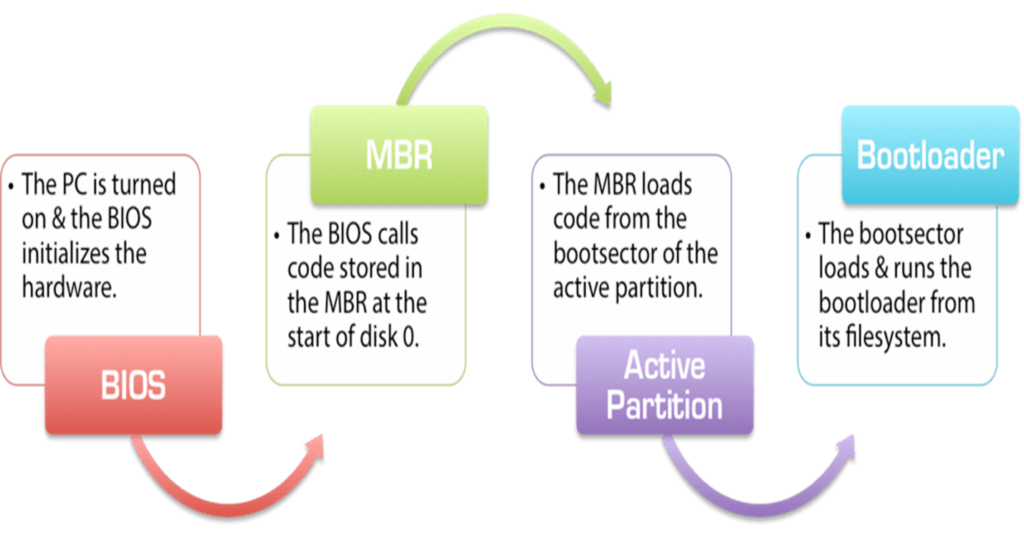
1.BIOS:
When the system is powered ON, the BIOS is the first program to be get executed to do the following:
•It will do POST operation on peripheral devices.
•It locates a valid device to boot the system. (CD, USB, HDD)
•It loads the bootloader program from the MBR (first sector of the boot device).
MBR (Master Boot Record):
•It is the first sector of the boot device.
•It has a memory block of 512 bytes, which contains the boot loader (machine code for booting instructions called GRUB (boot loader))
•And partition table (active, inactive).
•Once it loads the boot-loader into the memory, then BIOS gives control to the boot-loader.

2. BOOTLOADER:
•A bootloader is a piece of machine code that contains the booting instruction, and it is in the MBR.
Some bootloaders:
ØWindows – NTLDR
ØLinux – Grub, LILO (/boot/grub/grub.conf)
ØThere are two stages in this process:
Stage 1:
•It checks for active partition in MBR.
•As we discussed earlier, MBR must have partition details which are used to identify which partition is Active and inactive.
•Here active means the partition must have boot, OS related stuff and be marked as active.
•Inactive means the partition with user data, not OS-related stuff.
•Its sole job is to load the stage-2 bootloader process to the memory.
Stage 2:
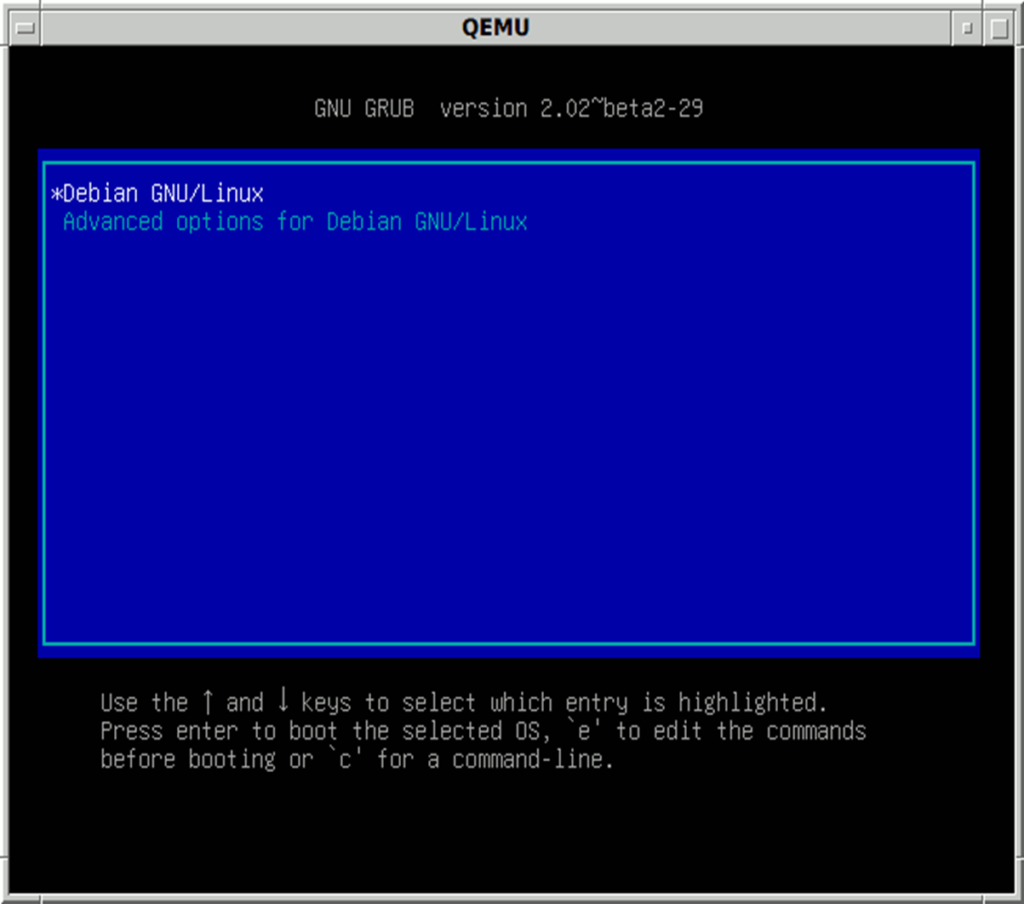
•In this stage, the Boot GUI screen will be available to the user.
•Once the user chooses the OS then, this stage will locate the corresponding Kernel from /boot/grub/grub.conf Directory.
•Now boot loader will load initrd images from the above Directory to the RAM.
•Here is initrd is a Linux initial RAM disk.
Initrd:
•It is the initial ram disk with the file extension ext2, which contains the necessary drivers and modules.
•The kernel work is to mount real /root file system, but it requires drivers and modules like (SCSI, LVM,NFS) that are present under /lib/modules.
•But if the root file is not mounted, so the Kernel could not access the above folder; hence the initrd comes into the picture.
•It is used to mount the temporary root file system. So, the Kernel can take necessary drivers from initrd.
•Once the kernel and initrd both load into the memory by bootloader, it gives control to the Kernel.

Kernel:
•The Kernel is the essential center of a computer operating system, the core that provides basic services.
•For all other parts of the operating system.
•A kernel can be contrasted with a shell, the outermost part of an operating system that interacts with the user.
•The Kernel decompresses kernel images from memory to /the boot directory (the user can see this as a screen msg).
•When Kernel is loaded, it immediately initializes and configures the computer memory and configures various hardware’s (I/O, storage devices).
•Then it looks for compressed initrd images in the memory, and Kernel will decompress it to /sysroot.
•The Directory is the temporary root file system.
•And this will provide the necessary drivers and modules to the Kernel.
•At the end, the initrd memory will get freed after the above process.
•The Kernel will mount the entire/root file system with read-only permission.
•And Kernel also releases unused memory.
INIT:
•Once the Kernel does the mounting of /root directory, it will control the INIT process by the/sbin/init process.
•This is the grandparent for all the systems that start automatically.
•First, it runs the /etc/rc.d/rc.sysinit script, which sets the environment path, starts the swap, checks the file systems, and executes all other steps required for system initialization.
•For example most systems use a clock, so rc.sysinit reads the /etc/sysconfig/clock configuration file to initialize the hardware clock.
•Another example is if there are special serial port processes that must be initialized, rc.sysinit executes the /etc/rc.serial file.
•The init scripts will investigate the/etc/inittab script.
•It consists of the run levels of the Linux system.
0 – Halt
1 – Single-user text mode
2 – Not used (user-definable)
3 – Full multi-user text mode
4 – Not used (user-definable)
5 – Full multi-user graphical mode (with an X-based login screen)
6 – Reboot
•The init scripts will set the source library from /etc/rc.d/init.d/function.
•This is used to configure how to Start, kill, and determine the PID of the process.
•Based on the above run level, it will look into /etc/rc.d/rc5.d/ (here 5 is the run level).
•It will execute the start, stop, and background processes available under this folder.
•The processes present under this Directory are a symbolic reference to this /etc/rc.d/init.d/ directory.
•The process presents under /etc/rc.d/rc5.d/ directory is of K and S type.
•Where, K is kill and S is start
The init will execute the following command during the BOOT process.
1./etc/rc.d/init.d/<command> stop # to kill
2./etc/rc.d/init.d/<command> start # to start
•Each process is prefixed with some number.
•The priority will give to a lower number.
•Sometimes a process can have the same number; in that case, the alphabetical order will be followed. The init will fork the /bin/mingetty process, which is used to give the virtual console based on the run level
•This will open the pathway to the tty devices and provide prompts like username, password, and print login details.
•If it is run level is five, then /etc/inittab runs the script called /etc/X11/prefer, which gives the display based on KDM, GNOME, XDM.
5. Execution:
Finally, the login screen will appear to the user.
i./etc/rc.d/init.d/<command> stop # to kill
ii./etc/rc.d/init.d/<command> start # to start
•Each process is prefixed with some number.
•The priority will give to a lower number.
•Sometimes a process can have the same number; in that case, the alphabetical order will be followed.
•The init will fork the /bin/mingetty process, which is used to give the virtual console based on the run level.
•This will open the pathway to the tty devices and provide prompts like username, password, and print login details.
•If it is run level is five, then /etc/inittab runs the script called /etc/X11/prefer, which gives the display based on KDM, GNOME, XDM.

Step 3: Rearrange the boot order
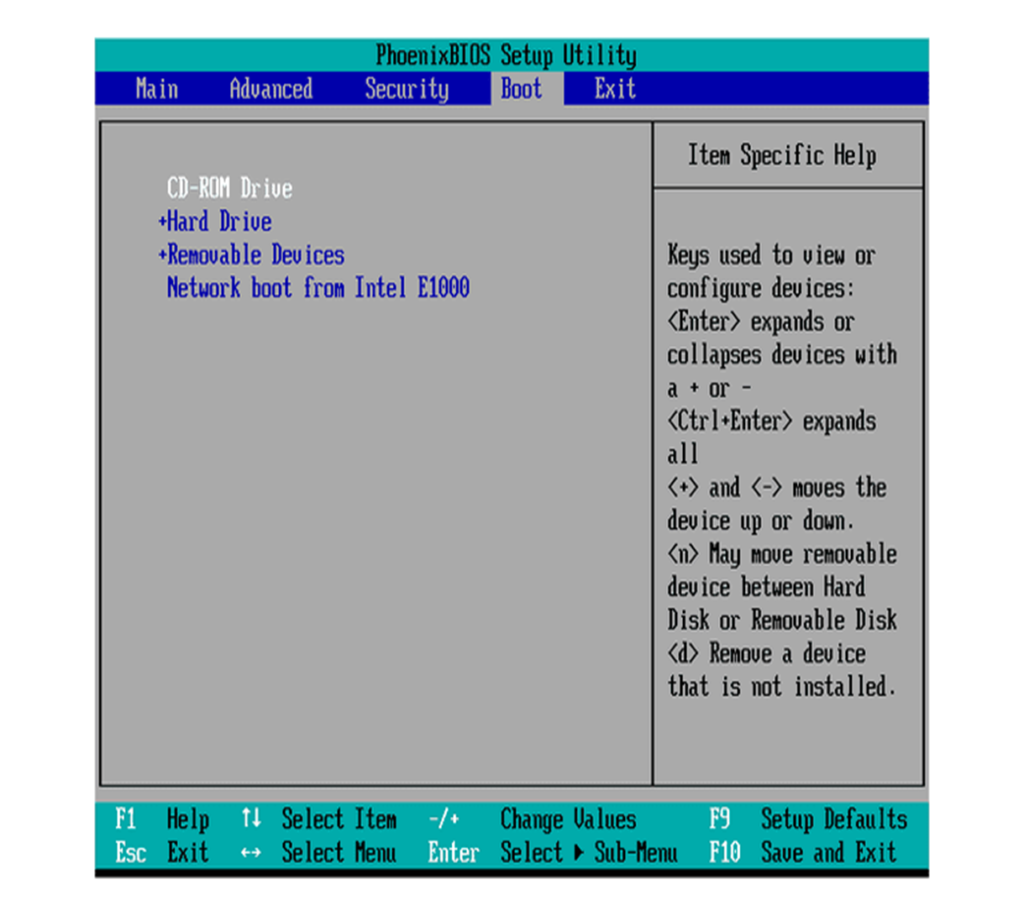
•You’ll notice a list of choices that your computer can load from once you’ve found the BIOS page for boot order options.
•The following options are commonly available on computers: Hard Drive, Optical (CD or DVD) Drive, Removable Devices (such as USB or Floppy), and Network.
•These options will again vary slightly between systems.
•A USB device or removable device should be listed first in the list.
Step 4: Save your modifications.
•To ensure that your changes are applied, save your changes before quitting BIOS.
•Select the “Save Changes” or “Exit with Changes Saved” option from the Save and Exit or Exit menu (or something similar)
•As you exit the BIOS, you can see a confirmation notice.
•Make sure you thoroughly read it before selecting the appropriate button to accept the changes.
•Once you quit BIOS, your machine will restart itself.


